Homemade Butter

posted by:  andy burger, february 4, 2025

HOMEMADE BUTTER (One Ingredient)

Takes about 20 minutes –

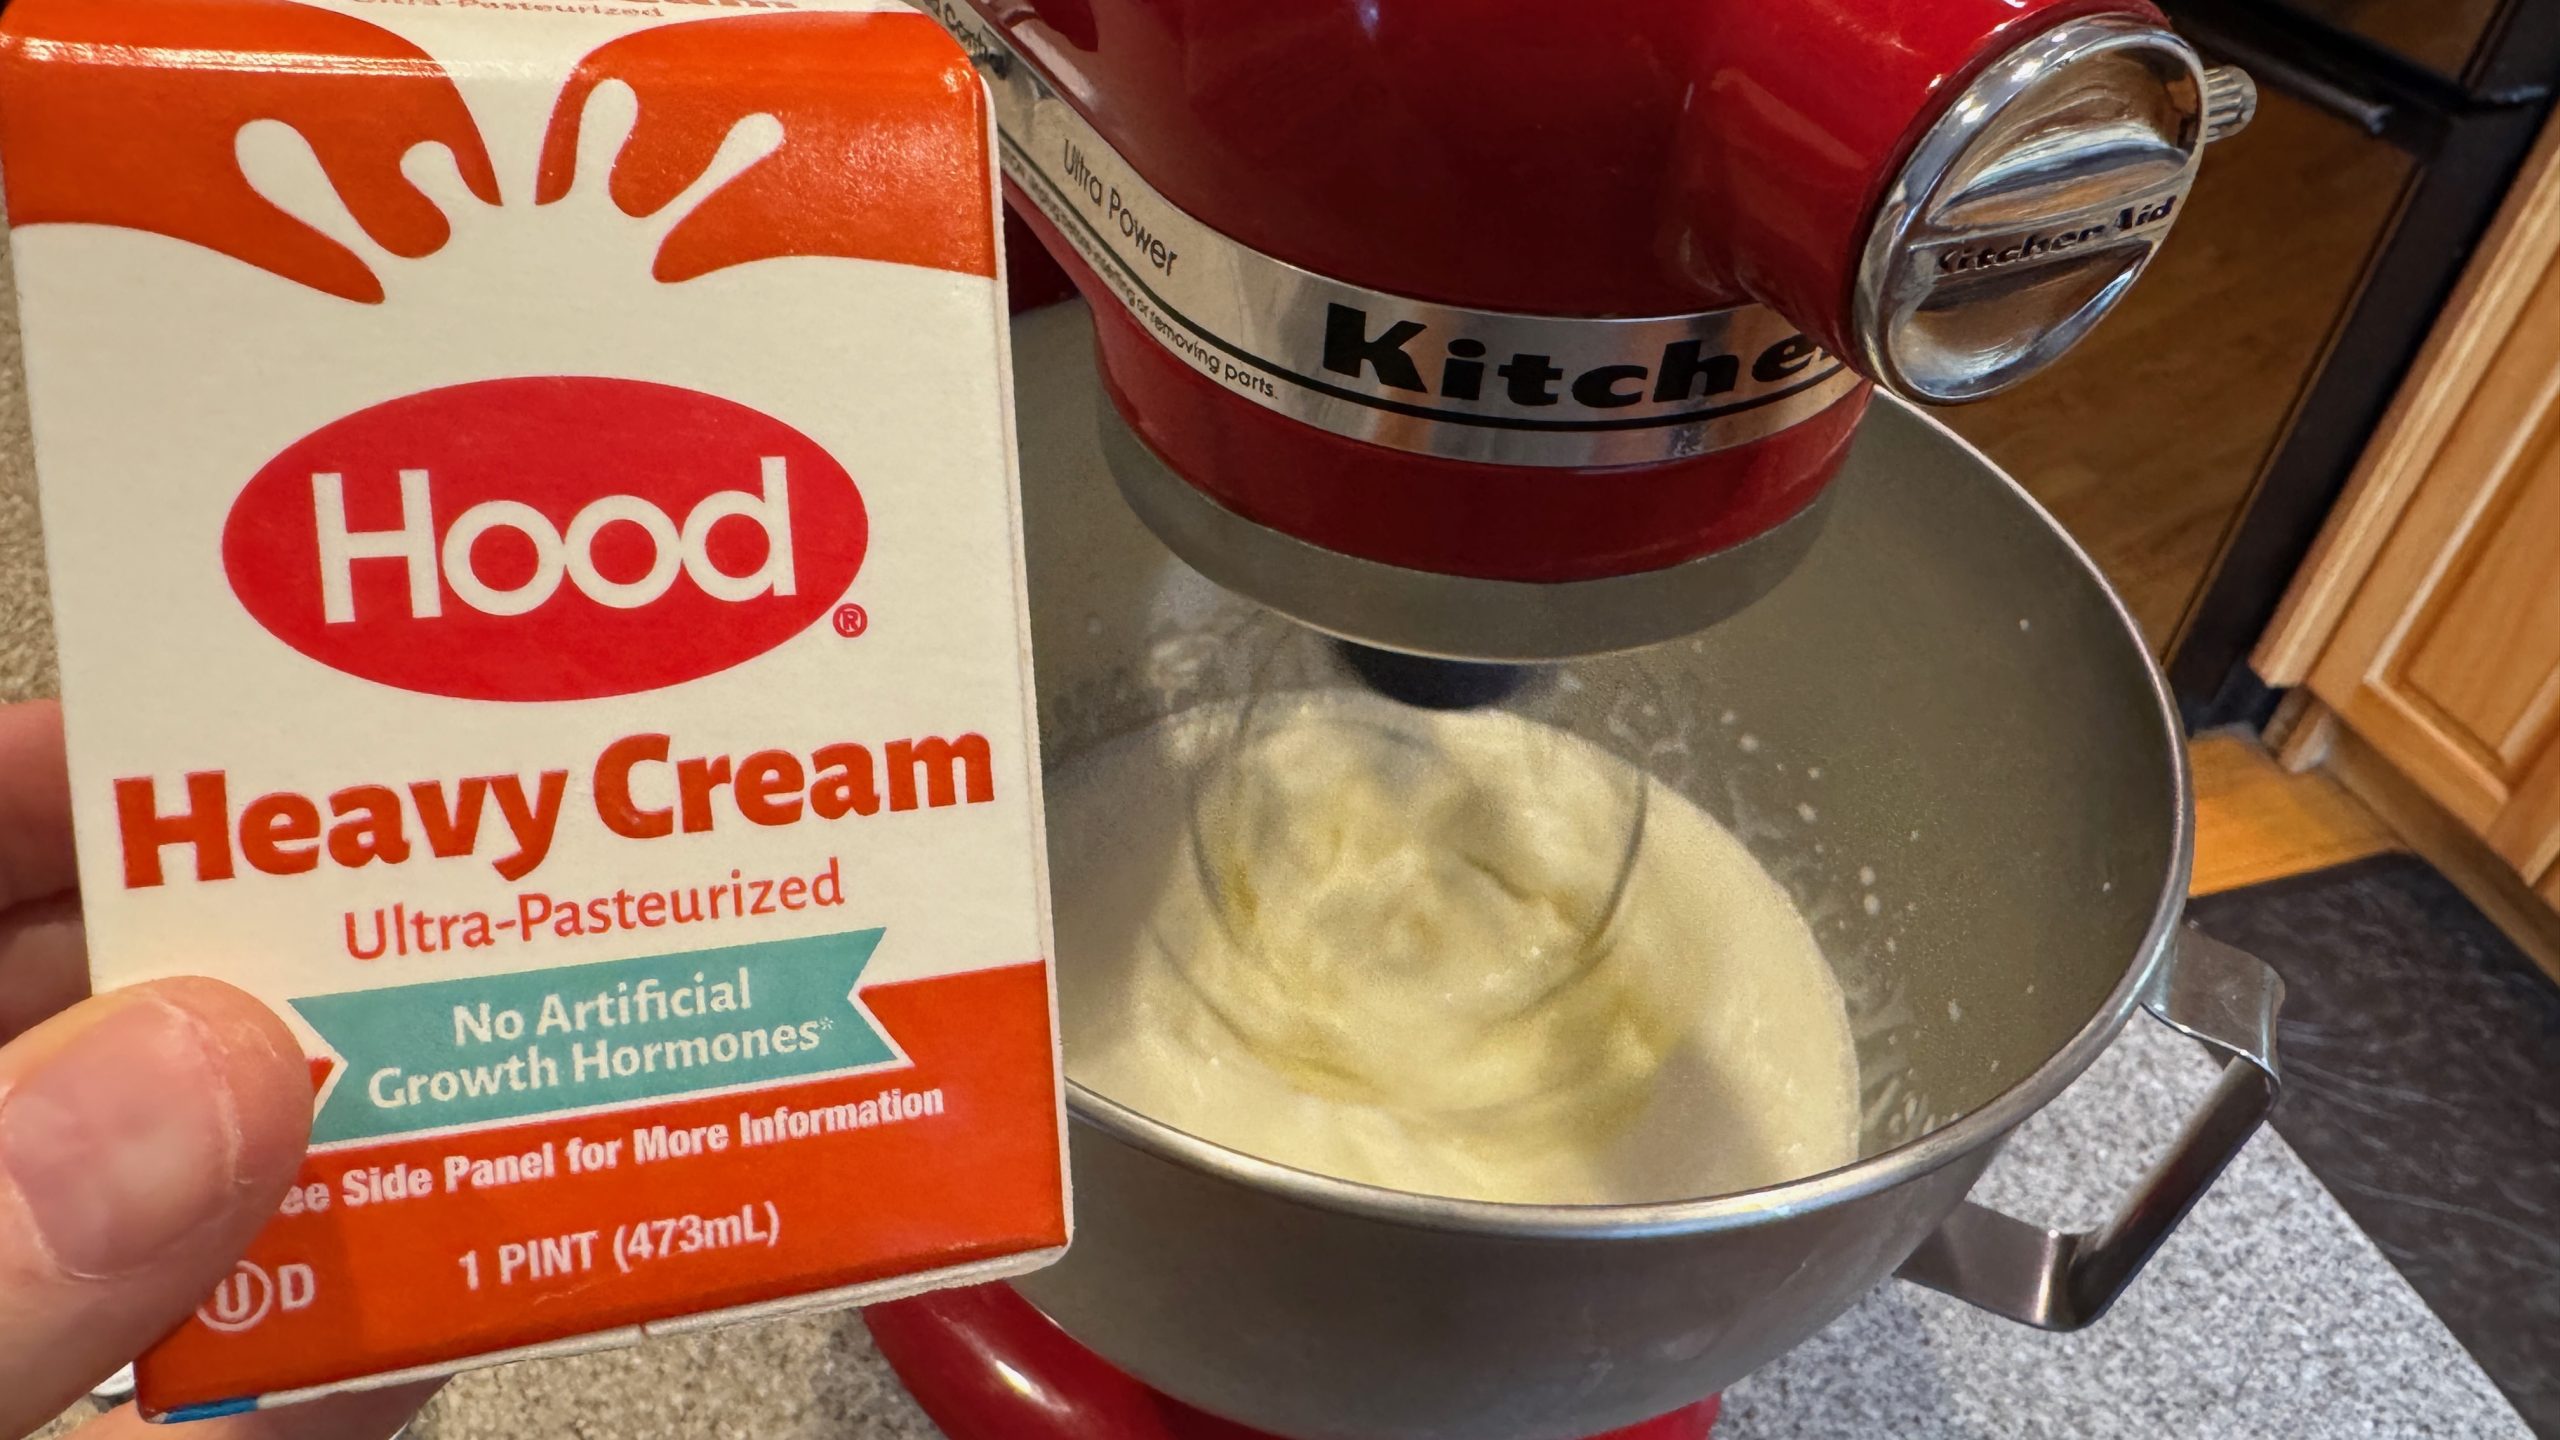
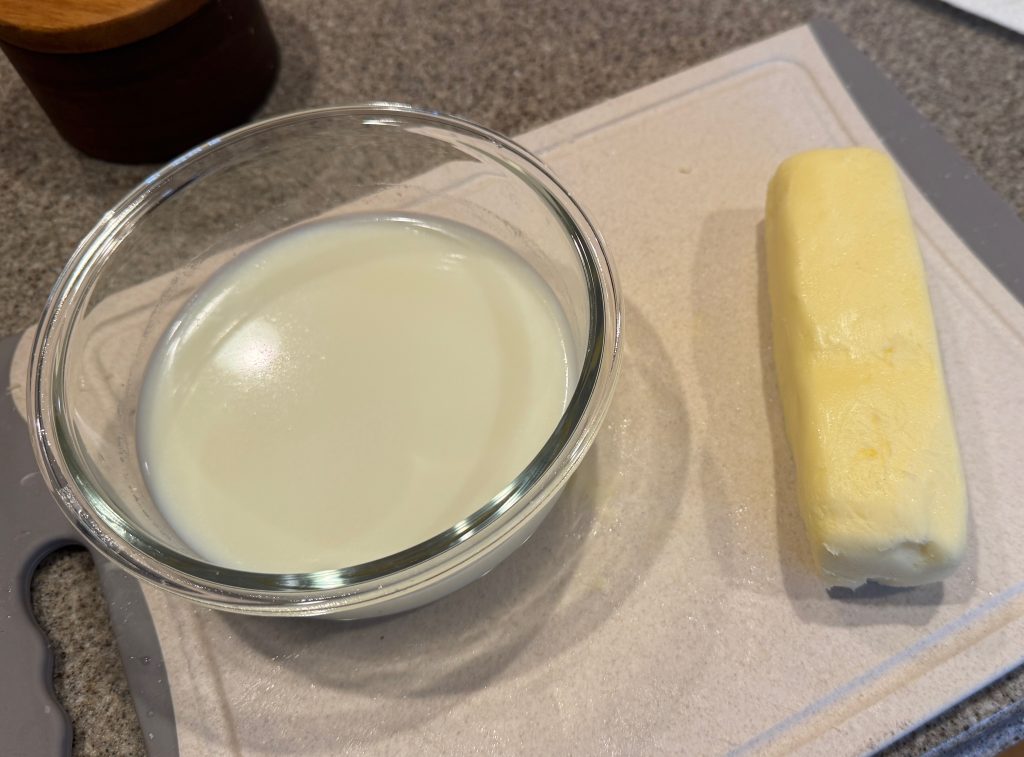
  1. Get a pint or quart of heavy cream at least 36% milk fat

  2. Get your handy dandy mixer ready- put your mixing bowl in the freezer for 5 minutes prior- you want it cold.

  3. Pour heavy cream into mixing bowl and start mixing on medium high

  4. In 3 minutes – it becomes whipped cream.

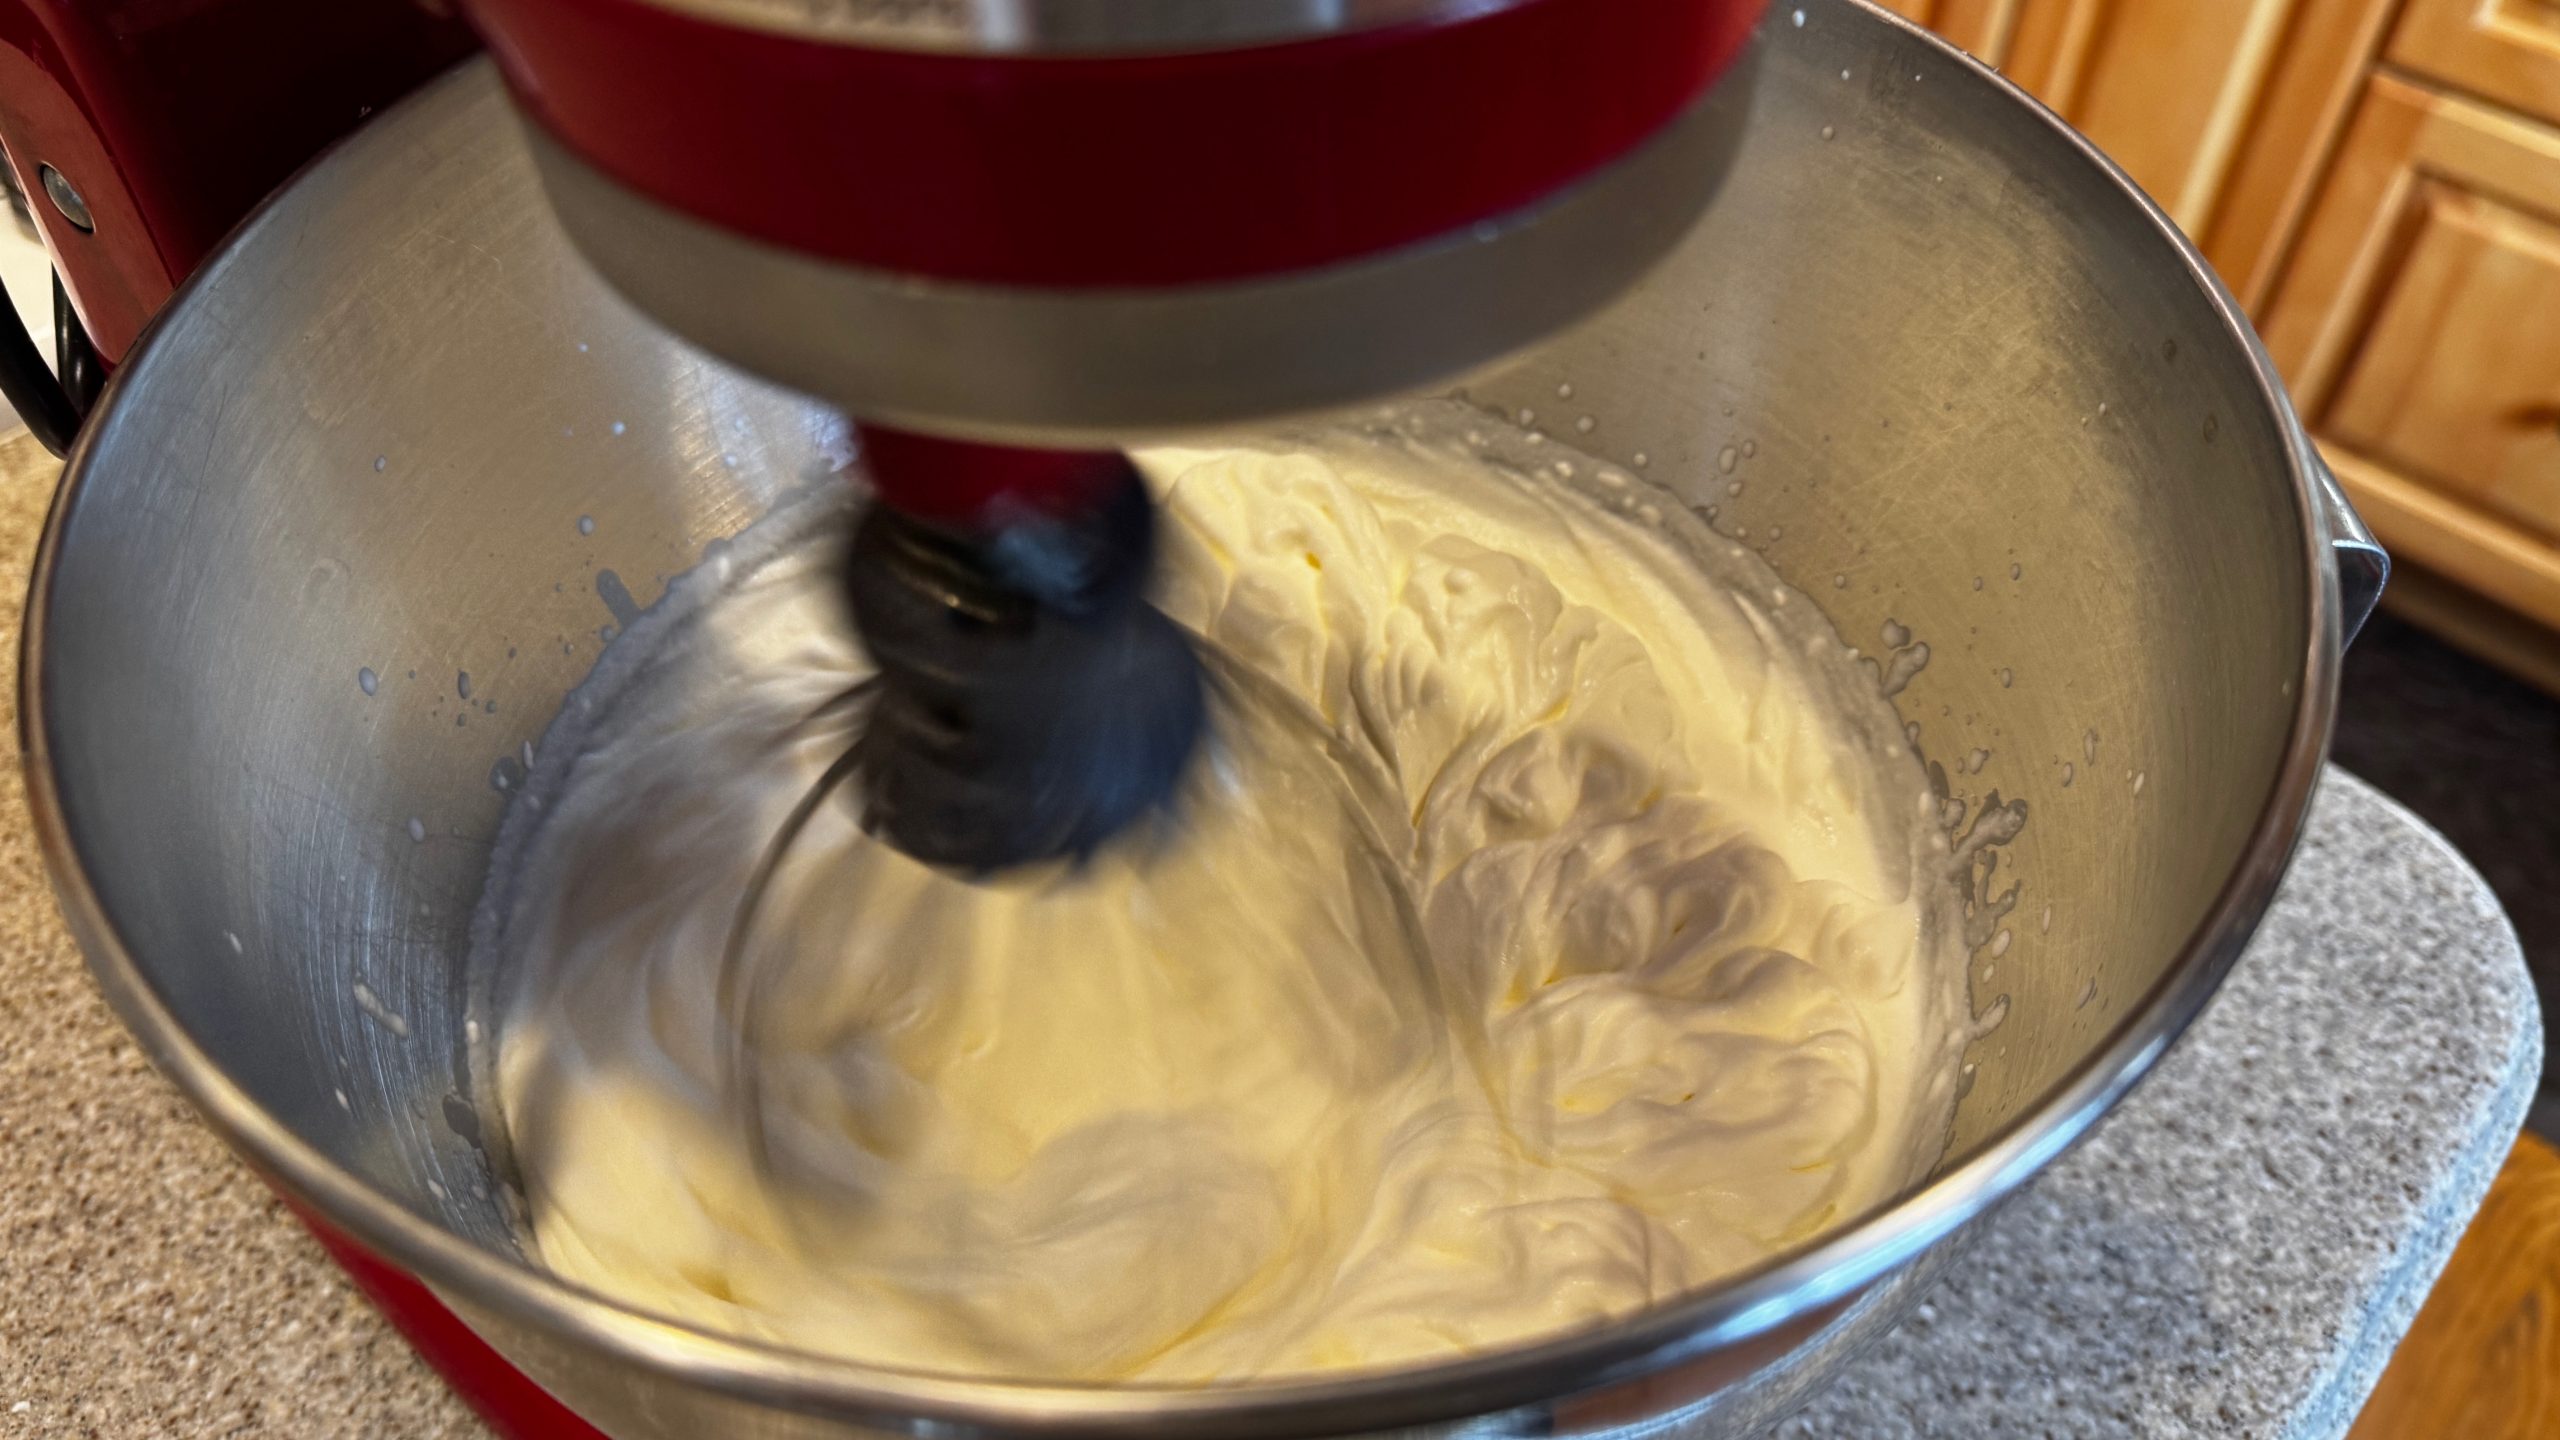
  5. Turn off and scrape everything from the sides back to the middle. Turn on again and keep mixing.

  6. Roughly 10-15 minutes later it will start to harden and will become whipped butter. Turn off, scrape to middle, turn back on.

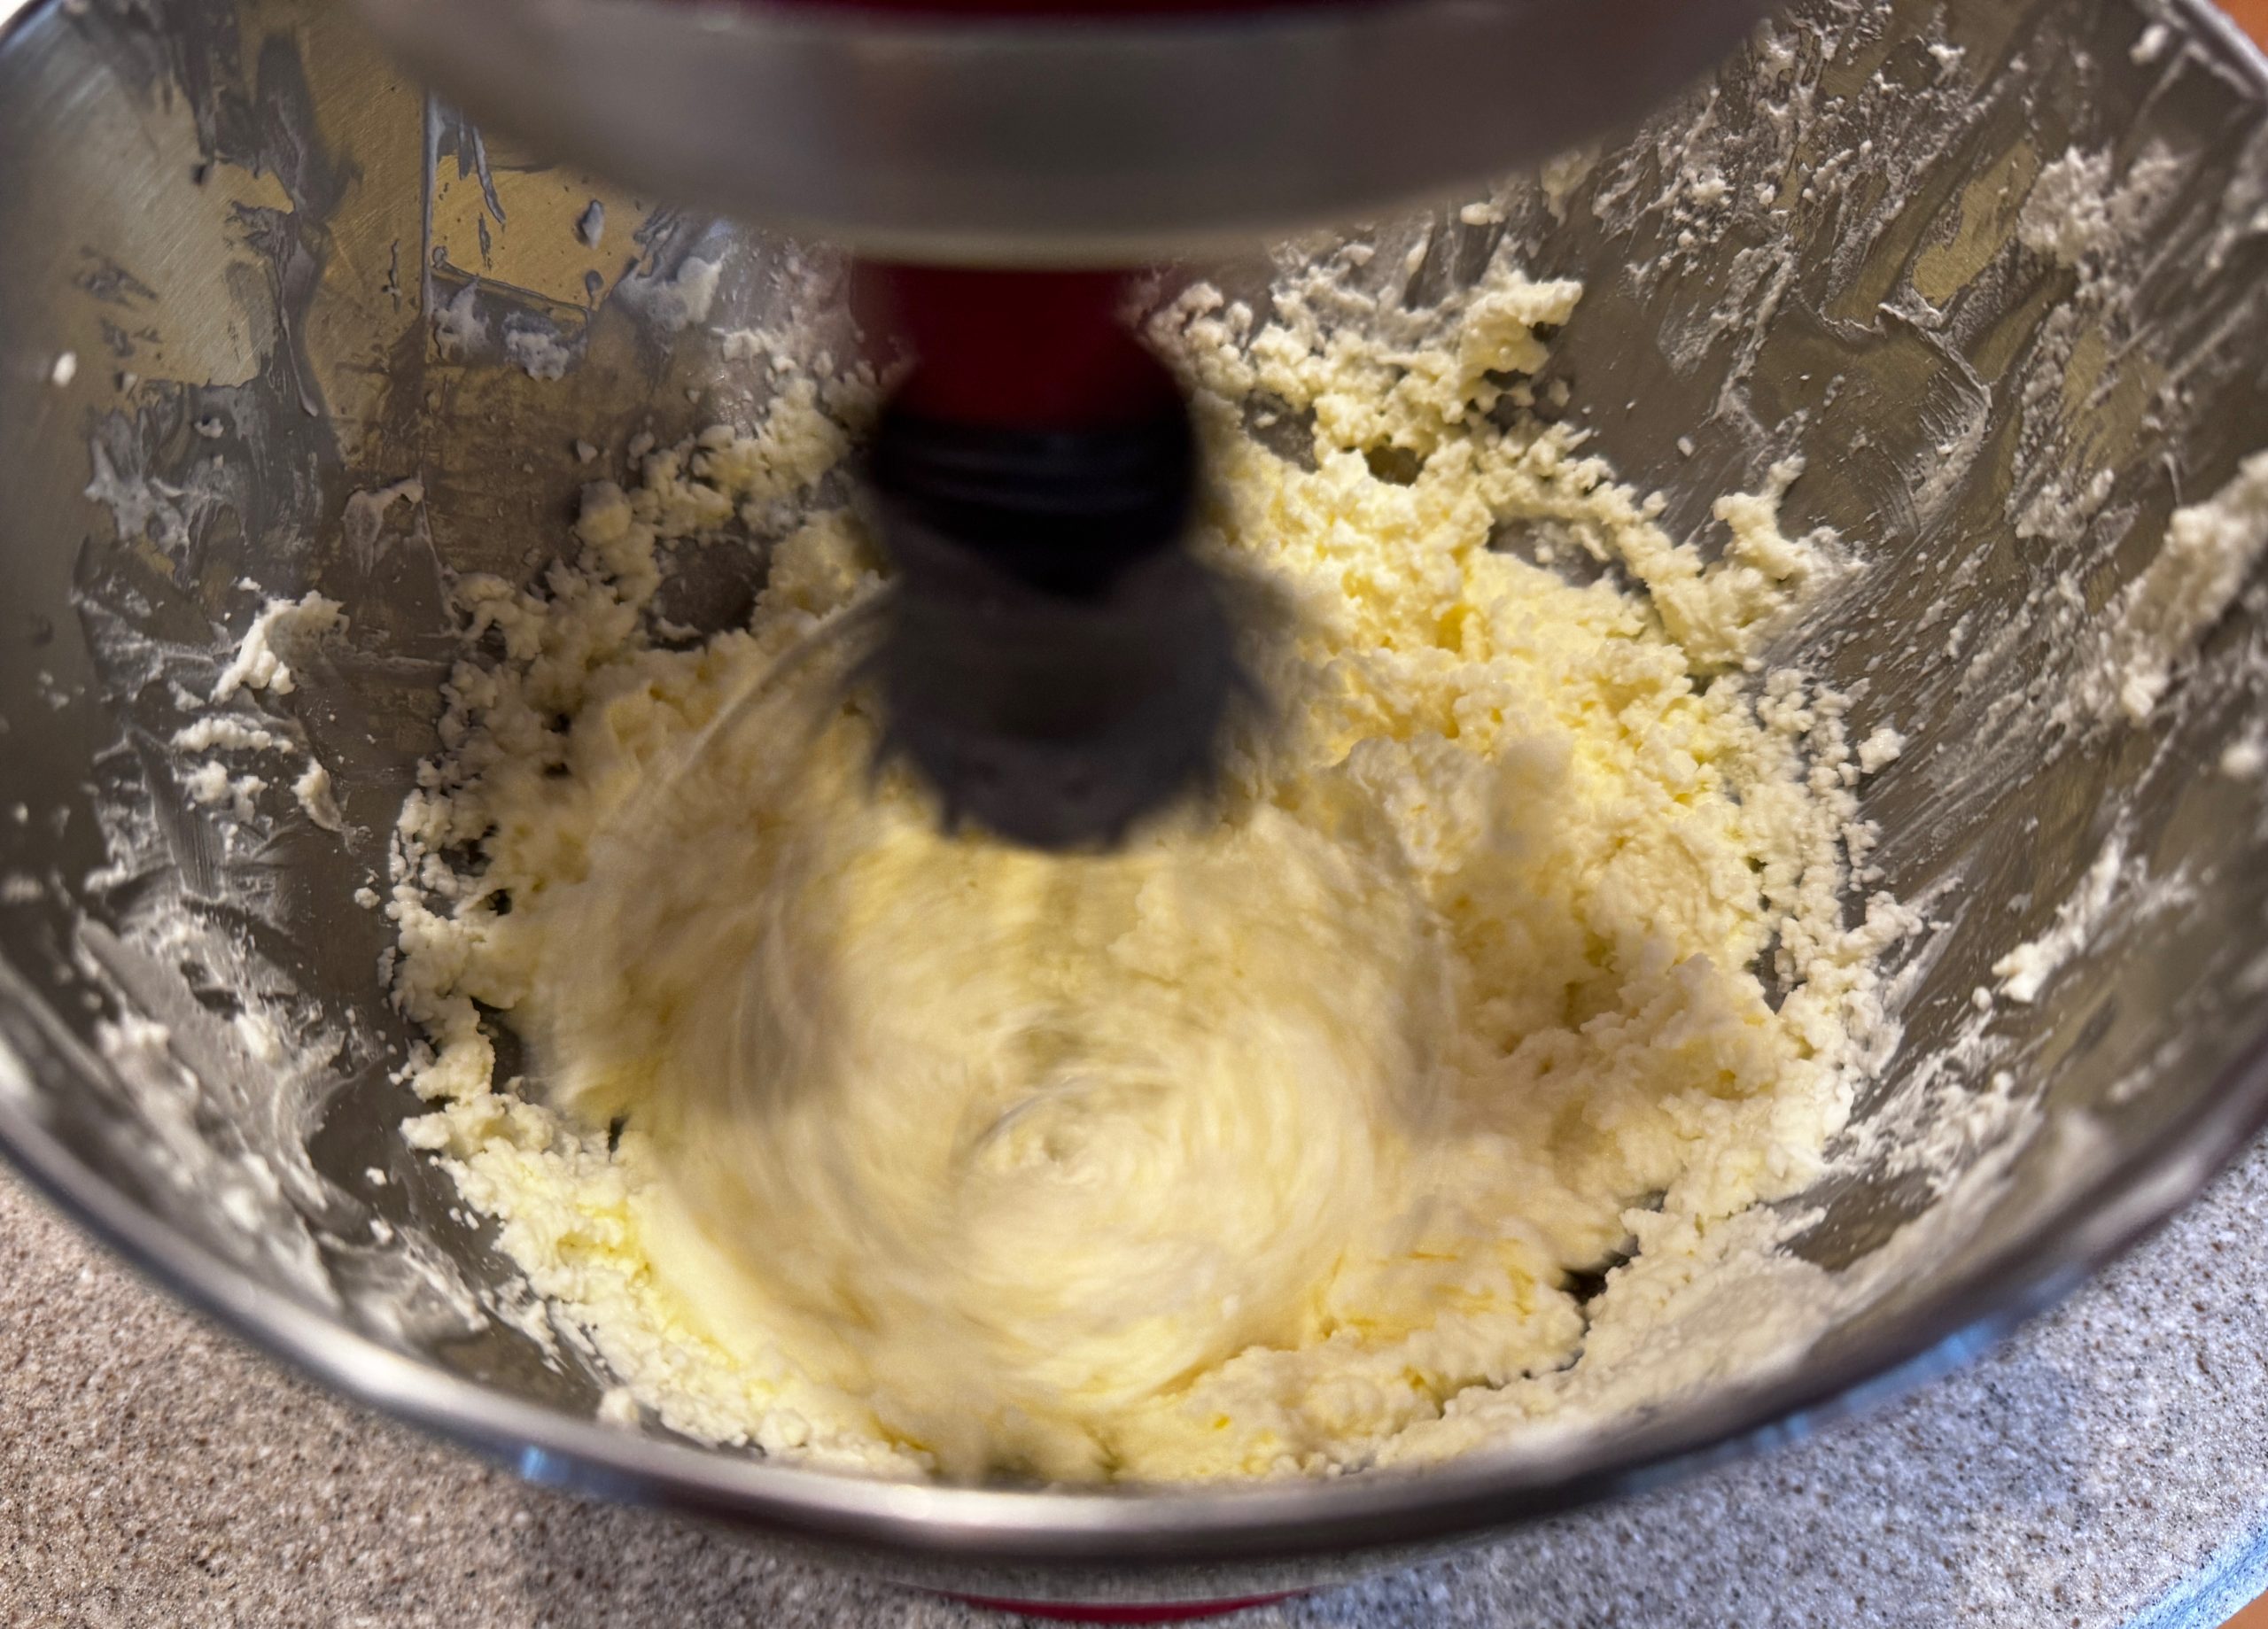
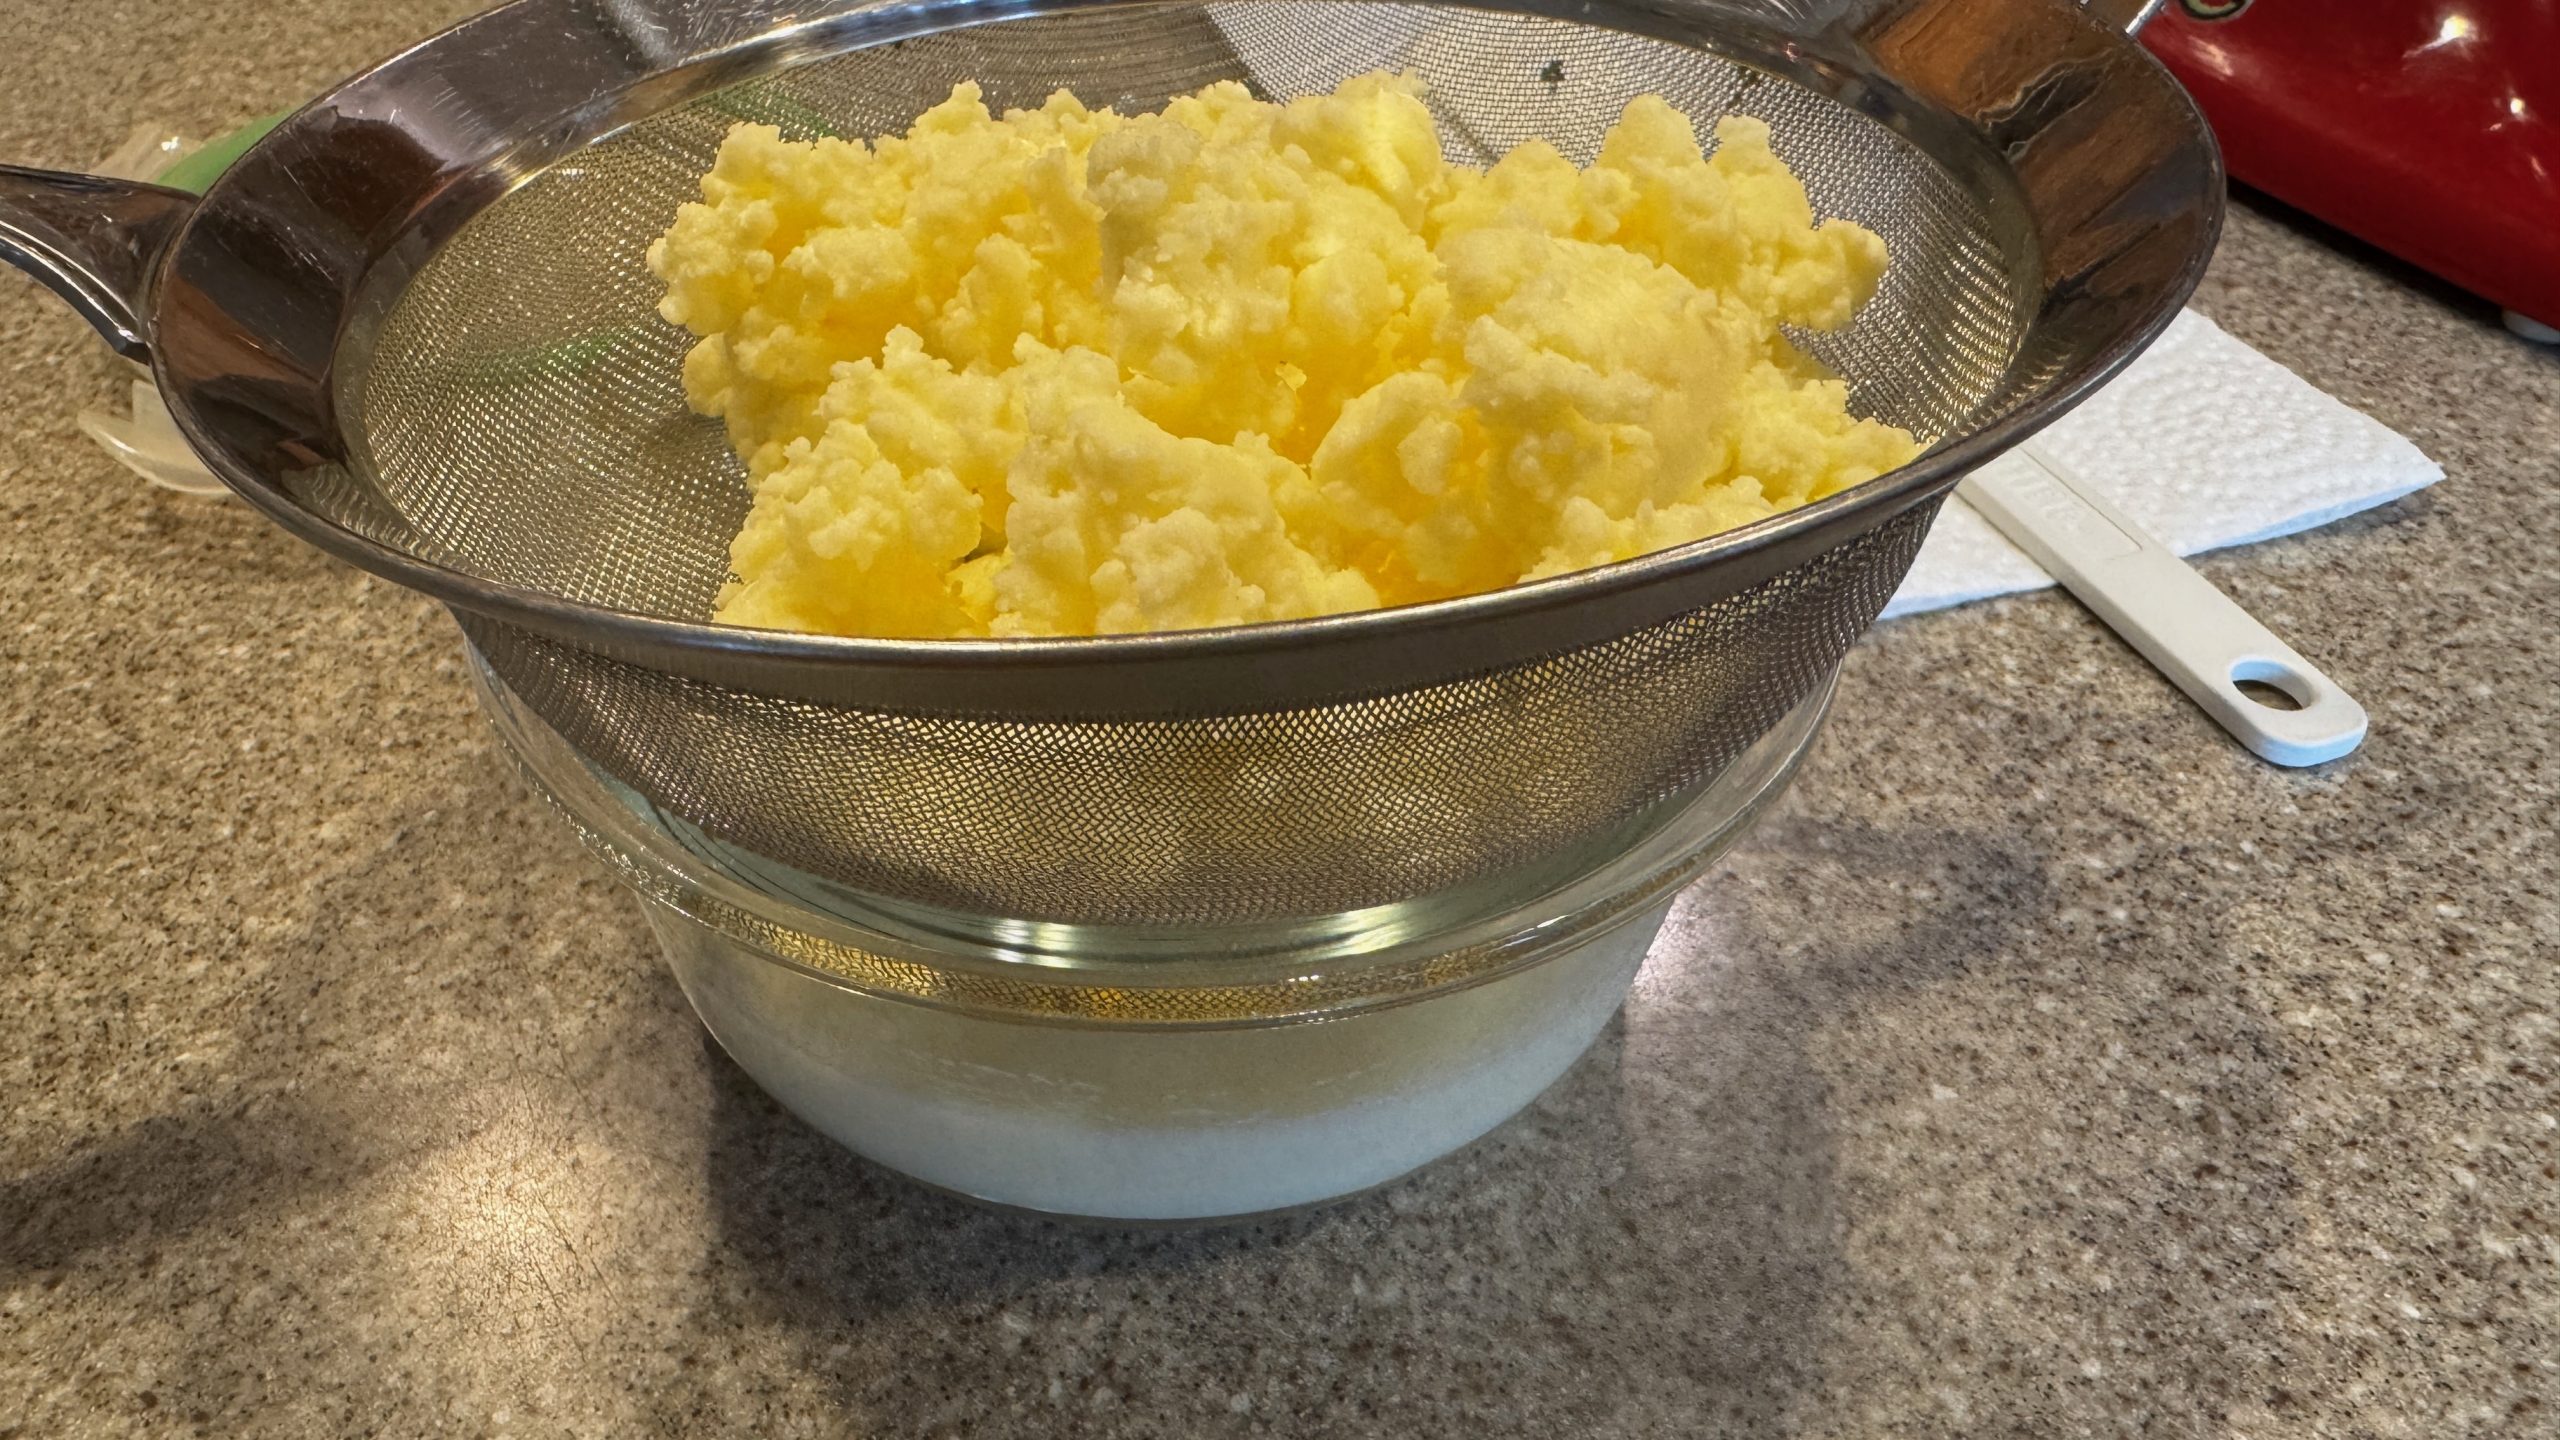
  7. 5 minutes or so it will start separating (milk liquid will be very liquid) and the butter itself will harden more.

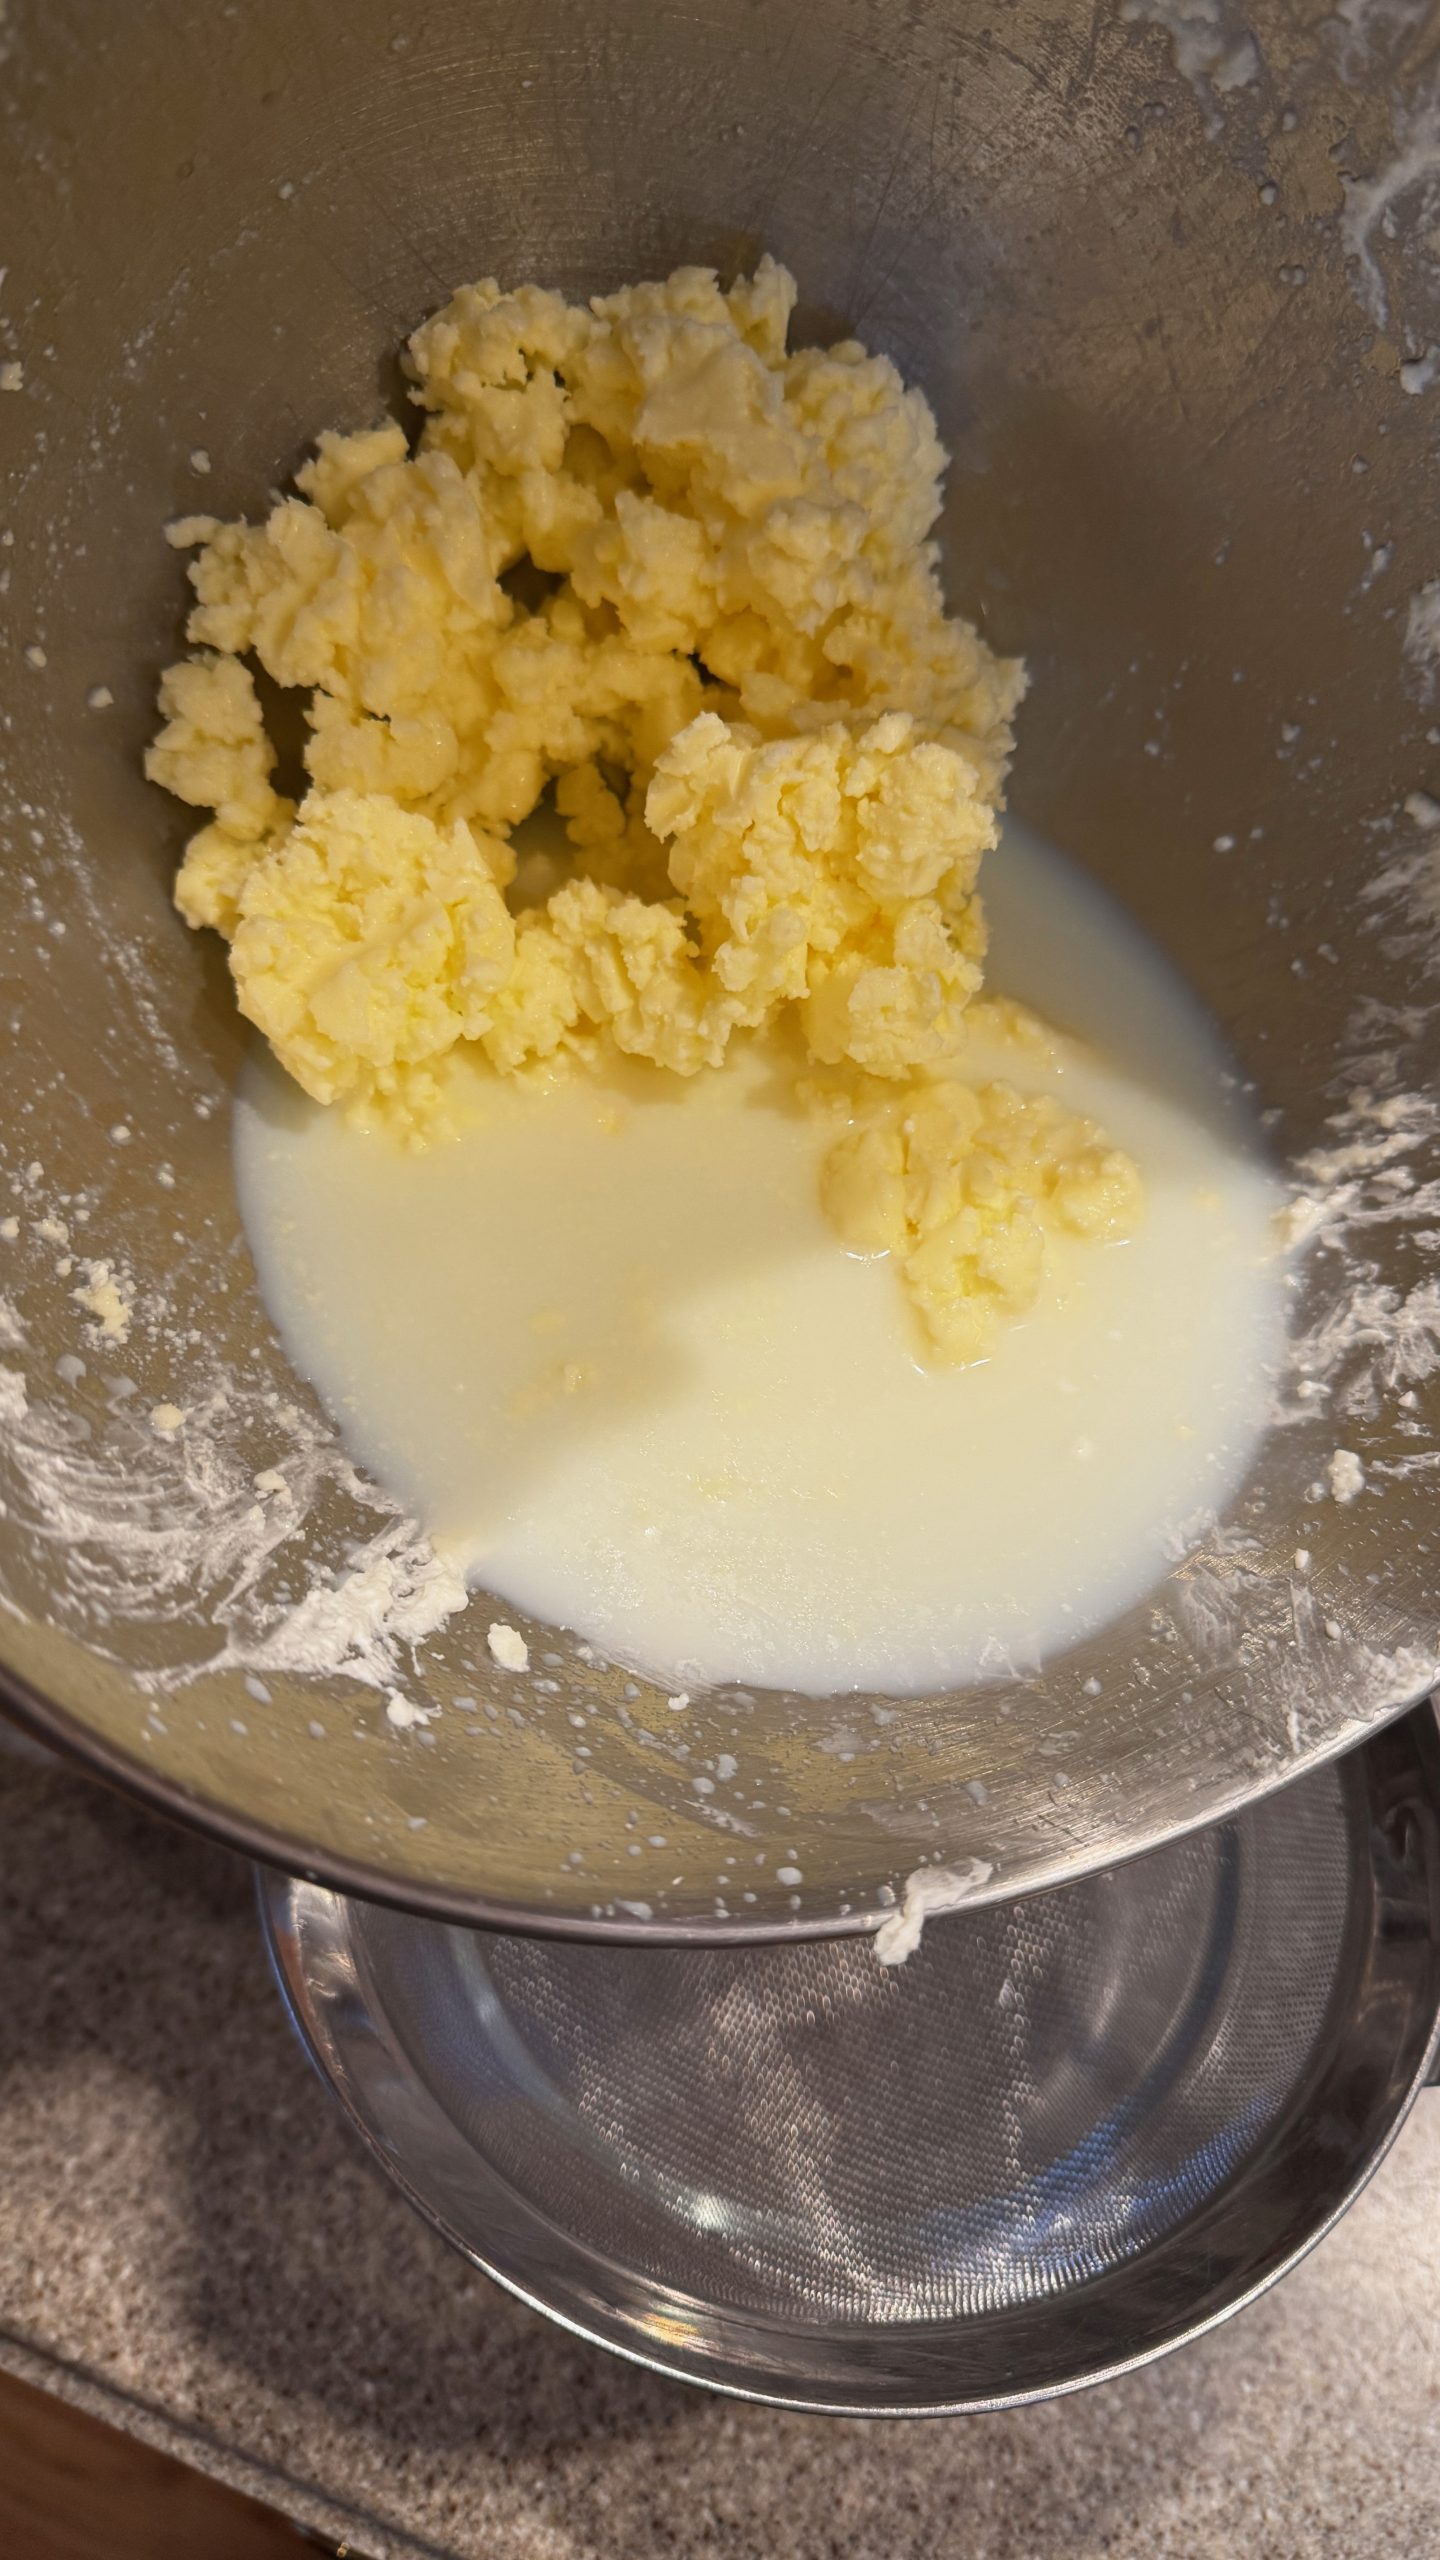
  8. A couple more minutes and liquid (which is now butter milk) can be poured out through a strainer leaving only the butter itself.

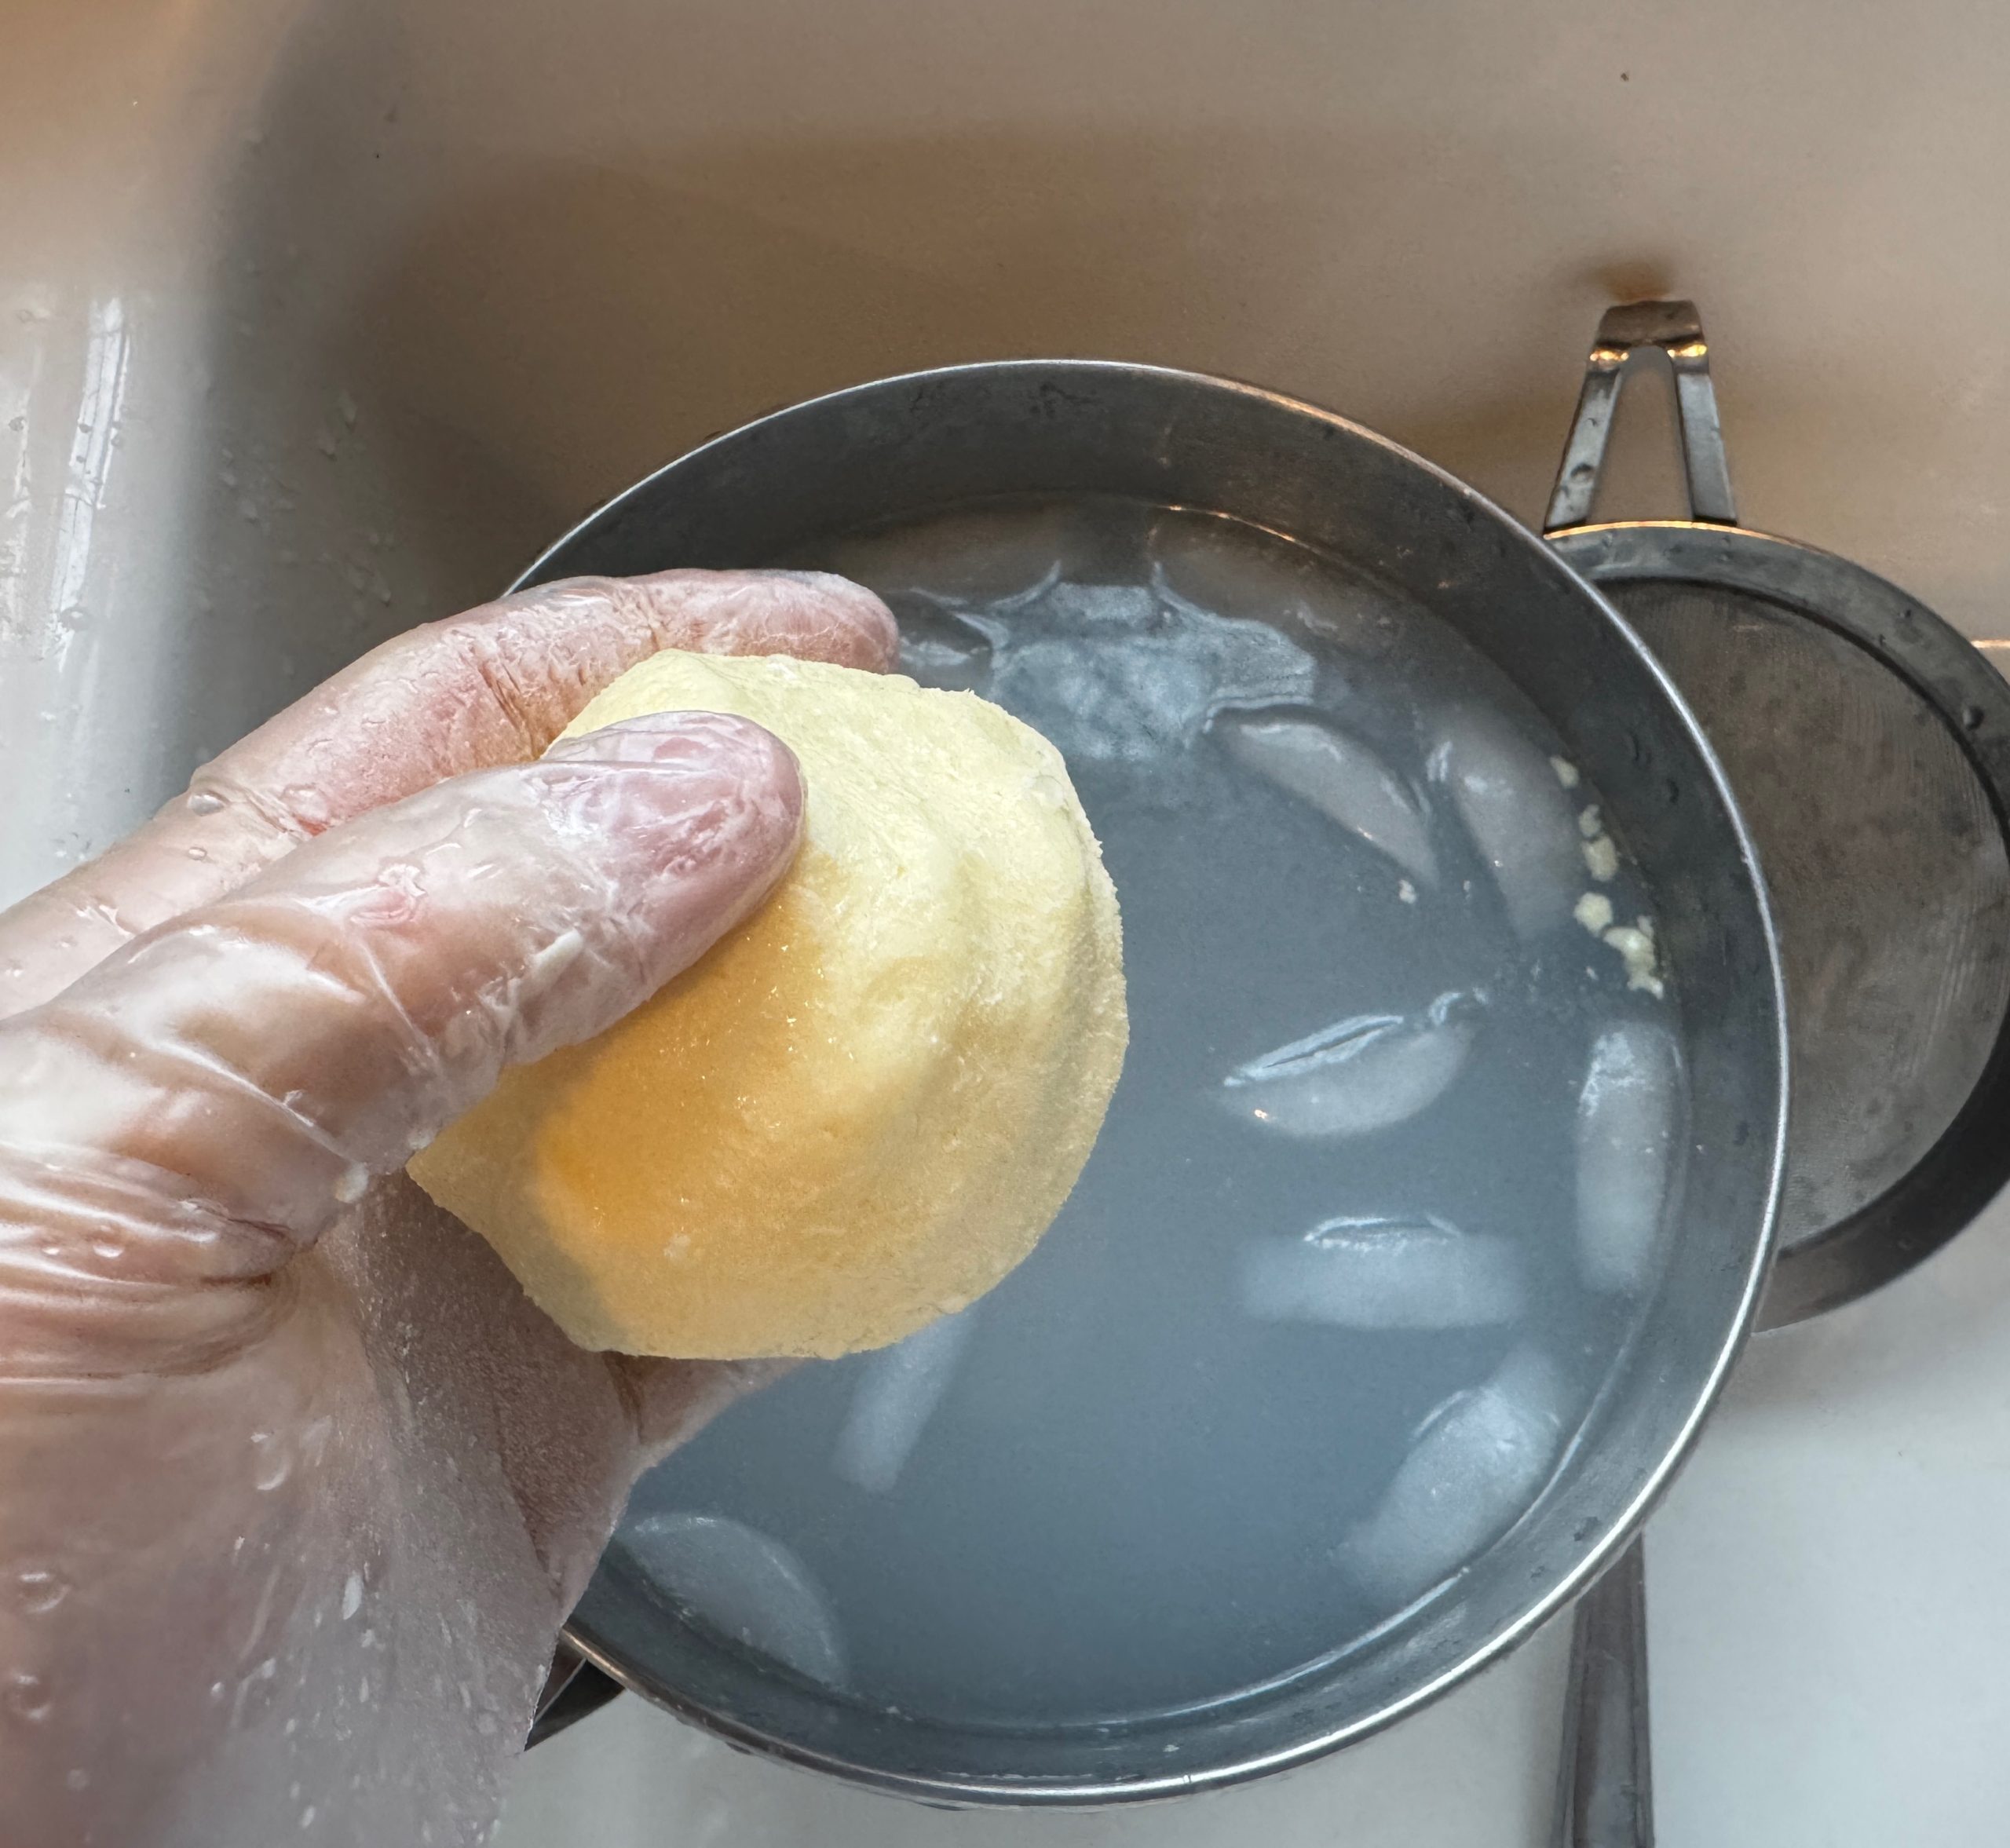
  9. In a cold ice bath. Ball up the remaining butter and squeeze and work until the liquid coming out is almost clear. Basically you are ringing out the remaining butter milk from the solid.

  10. On a cold cutting board, sprinkle some kosher salt and work into the butter shaping as you go….. whallah- you have salted butter. If you don’t use salt you have unsalted butter. If you add a teaspoon or so of honey and work in- you have honey butter.

  11. AND you have some left over buttermilk to marinate those chicken thighs or breasts you were thinking about frying up 😎❤️

Enjoy the Step By Step Photos

Step 1 - get yourself some heavy cream at least 36% milk fat
Step 2: Start mixing on meduim-high, in 5 minutes you'll have unsweetend whipped cream
Step 3 - keep mixing after whipped and it will start to harden
Step 4 - Keep mixing until you see the butter separate from the "Butter Milk"
Step 5 - Strain off Butter Milk
Step 6 - In cold ice bath, ball up and squeeze until water runs clear from butter
Step 7 - On cold cutting board, work in some salt and mold to the shape you want.

Slow Grilled Wing Dingers

posted by:  andy burger, october 30, 2022

the easiest and most consistent game day slow cooked chicken wingers you can make – but takes time and love, care and affection on the grillb 🙂   an easy sauce recipe below as well.  

Slow Cooked Wing Dingers

head to your local BJ’s, Costco, or grocery store and buy a bag of frozen wings (Already sectioned) – or your grocery store wings and section when you get home.   thaw wings fully if frozen.  

Takes about an hour –

1.     A bag of frozen sectioned chicken wings, or grocery store wings, just section them….If Frozen, thaw first.
2.     Toss Wing sections in large bowl with Extra Virgin Olive Oil. 
3.     Liberally coat the wings with 25 % Kosher Salt and 75 % Lemmon Pepper spice – liberally.
4.     Pre-Heat Grill with non-stick – Medium Heat only, Error on the low temp side.
5.     Place wings spaced on grill grates
6.     Turn wings every 5 minutes regardless – keep turning to get evenly brown.  If you have hot spots on your grill, move wings cooking quicker around and get all of the wings cooked evenly.
7.     You will cook the wings on Medium -Low heat for about 45 minutes or 8 to 10 turns
8.     The wing meat will start to separate from the bones, they will start getting crispy
9.     Brush on your BBQ/Wing Mixture all over the wings and – ONLY COOK for 5 minutes longer.  The web sauce will burn quickly once on the hot grill grates that have been on for almost an hour.

BBQ Wing Mixture.  Easy-Peacey and no fuss.  ½ cheap Open Pit BBQ sauce – ½ Sweet Baby Rays Wing Sauce. 

Enjoy the Step By Step Photos

Step 1 - pre-heat (MEDIUM Heat)Grill and spray with a LOT of non-stick
Step 2: Assemble Ingredients: Bag of Frozen Chicken Wings (Thawed)
Step 3 - Coat with Salt / Lemon Pepper Mix
Step 4 - After coating with EVO / Salt / Lemon Pepper, put on pre-heated grill
Step 5 - Turn Wings Each 5 minutes regardless (45-50 minutes total)
Step 6 - Mix Open Pit and Wing Sauce 50/50
Step 7 - Coat with BBQ/Wing Mixture, cook 5 minutes longer only.

GRILLED Steamed Dumplings

posted by:  andy burger, august 4, 2022

Do you like fried dumplings but don’t like the calories? Do you like steamed dumplings, but feel you are eating a mouthful of uncooked flour ?  Never say iBuggy wasn’t looking out for you – here we go 🙂

GRILLED STEAMED DUMPLINGS

Head to you local Chinese Restaurant and buy a couple orders of regular white kind of normal bland looking steamed mealy dumpling(s) order.  It doesn’t really matter how good they are – trust me the process will make them amazing.   Make sure you grab a bunch of dumpling sauce, at least one extra container per order (for options)
  • pre-heat your gas or charcoal grill to hot and spray coat lots with PAM or a non-stick
  • take the dumpling sauce they give you with the dumplings and add to bowl – (optional) add iBuggy extreme hot sauce, or any hot sauce in your cabinet to dumpling sauce
  • stir sauce (with or without hot sauce) and set aside
  • put dumplings into glass bowl and lightly coat with Extra Virgin Olive Oil and some salt and pepper, coat ensuring all sides of dumpling are covered
  • put your dumplings on the grates direct
  • turn every minute, top/bottom/both sides, keep turning until golden brown
  • once done, put back into clean bowl
  • serve and eat with hot dumpling sauce or regular dumpling sauce or whatever 🙂
    Takes about 10 minutes start to finish – thank me the next time you see me.  By the way, they reheat perfectly the next day and are just like they came off the grill. Nuke for 30 seconds 😍

    Enjoy the Step By Step Photos

    Chinese Restaurant Order (Steamed Dumplings)
    Step 3 - Hot Sauce in Dumpling Sauce
    Step 6 - Dumplings on Grill (flat side down at first)
    Step 9 - flip to sides and brown
    Step 12 - place into glass serving bowl
    Step 1 - pre-heat Grill and spray with a LOT of non-stick
    Step 4 - Dumplings in Bowl (and prep with EVO, etc.)
    Step 7 - Flip each minute - round side down
    Step 10 - Flip to other side
    Step 2 - Sauce Prep (optional add hot sauce)
    Step 5 - toss dumplings with EVO - Salt and Pepper
    Step 8 - keep flipping a couple more times
    Step 11 - a couple more flips to ensure grilled consistency
    Cut and Sauce (Enjoy)

    the West Virginia hot dog

    posted by:  andy burger, january 10, 2021

    if you are from West Virginia and know the true nature of a West Virginia hotdog, you may pick up a tip, if you are not from WV, you will be exposed to a culinary delight.

    at iBuggy, we’ve captured a version of a true West Virginia Hot Dog and the madness around my method.  I’ve had a mustache for 35 of my years of my life and you adapt in some basic things over the years by having the caterpillar on your face – simple things you have to deal with that other clean facers don’t have to deal with 🙂

    The Toppings: onions, mustard, chili and sweet southern coleslaw – The ORDER of of the toppings as listed (very important)

    West Virginia Hot Dog making and assembly at your own risk….

    Step 1:  Top Sliced Hot Dog Buns ONLY (you can fit more stuff in them), HOWEVER, you must hollow them out some, to make room for the condiments, because in the end really its about the condiments – you can take a very very average hot dog and turn it into Magic with the right condiment combination.

    Step 2:  Lightly toast the bun with the hollowed side up – just lightly to crisp up the inside just a tad. This helps from the liquids to not permeate through the bread to the bottom and make a hand mess

    Step 3:  Diced onions on bottom first. This creates a foundation barrier and they all stay together and don’t fall off everywhere protecting the soft bead underneath

    Step 4:  Mustard of your choosing – basic Yellow is mine. Mustard on top of the Onions helps seal some of the cracks and crevices but also helps keep the onions together

    Step 5:  Chili – No Beans – Canned Hormel chili is amazingly perfect Hot Dog clili. Not for chili eating, but hot dog chili, really doesn’t get any better

    Step 6:  HomeMade Creamy Cole slaw (on the sweeter side) – Spread the bun out (make it wider) just a tad then cover the entire top with a nice layer of Cole Slaw

    Step 7:  Simply lay your doggie on top, and take a bite that will be amazing. Dog on Top, Dog on Top – you’ll thank me later 🙂

    so why coleslaw as the last topping? That helps seal in the Chili from dripping out everywhere. …. I know the order will create debates on non-traditional, how it looks, etc….. But at the end of the day, its not about how it looks, its about how it tastes and how it stays together – AND MORE IMPORTANTLY for me – my mustache thanks me.

    So why isn’t it listed how to cook a hot dog properly?  Well, it really doesn’t matter, its all about the toppings and how you assemble them.  Feel free to use a dirty water dog, grilled dog, boiled or fried dog – it won’t really matter.  But, as shown, this is a grilled Nathan’s dog.

    Enjoy the Step By Step Photos

    the top-sliced bun
    Step 4 - the mustard
    Step 7 and the "doggie on top"
    Step 1 - slice/make room
    Step 5 - the chili
    Step 3 - onions down first
    Step 6 - the sweet coleslaw
    last step- the perfect bite 🙂